Posts

Showing posts with the label Remote

Ubuntu : Install FreeNX

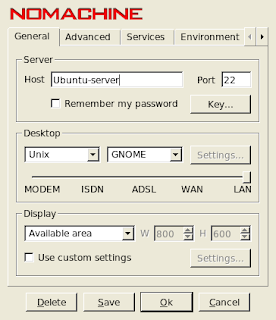
FreeNX เป็นคนละตัวกับ NXServer ของ nomachine ครับ (ของ nomachine จำกัดแค่ 2 session เอง) 1.เพิ่ม repository nano /etc/apt/sources.list เพิ่ม deb http://ppa.launchpad.net/freenx-team/ppa/ubuntu VERSION main deb-src http://ppa.launchpad.net/freenx-team/ppa/ubuntu VERSION main เพิ่ม key แล้ว update apt-key adv --recv-keys --keyserver keyserver.ubuntu.com 2a8e3034d018a4ce apt-get update 2.ติดตั้ง server aptitude install freenx 3.ติดตั้ง client (ใช้ของ nomachine) wget http://64.34.161.181/download/3.4.0/Linux/FE/nxserver_3.4.0-12_i386.deb dpkg -i nxclient_3.4.0-5_i386.deb 4.กรณีต้องการเปลี่ยน SSH key dpkg-reconfigure freenx-server เลือก Create new custom keys จะได้ key อยู่ที่ /var/lib/nxserver/home/custom_keys/client.id_dsa.key สำหรับเอาไป import เข้า nxclient อาจ copy ไปโดยให้คำสั่ง ที่ server cp /var/lib/nxserver/home/custom_keys/client.id_dsa.key ~/ ที่ client scp user@freenx-server:~/client.id_dsa.key ~/
Remote control Ubuntu from Ubuntu

Image
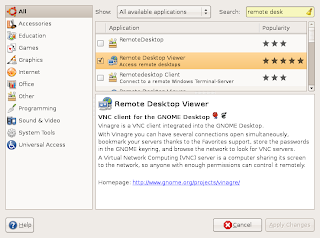
วิธี Remote เข้าไปใช้งาน Ubuntu จาก Ubuntu อีกเครื่องหนึ่ง 1. Text mode ด้วย ssh ssh username@host เช่น ssh komkid@ubuntu-server 2.GUI โดยใช้ vncviewer, Remote Desktop Viewer ด้วยวิธีเดียวกันกับที่ remote ไป Windows 3.ใช้ FreeNX Client ติดต่อไปสร้าง Session ในการ login อันดับแรกก็ download Client จาก NoMachine เลือกที่เป็น DEB แล้วติดตั้งด้วยคำสั่ง sudo dpkg -i nxclient_3.2.0-14_i386.deb จากนั้นโปรแกรมก็จะเข้าไปอยู่ใน Applications > Internet > NX Client for Linux แล้วก็ทำการตั้งค่าเหมือนกับ ที่ทำใน Windows

Linux (Ubuntu) in Windows #1

อยากใช้ Linux (Ubuntu) แต่เสียดาย Windows เรื่องนี้คงเป็นเรื่องที่หลายคนสนใจ แล้วใช้ทางเลือกต่าง ๆ เหล่านี้ 1.ใช้ Windows แล้วติดตั้ง Ubuntu ใน VMware หรือไม่ก็ VirtualBox 2.ใช้ Ubuntu แล้วติดตั้ง Windows ใน VirtualBox ( VMware ใน Ubuntu มีมั้ยน้อ) 3.ติดตั้ง Ubuntu แล้ว Remote เข้าไปใช้ Windows 4.ติดตั้ง Ubuntu แล้ว Remote เข้าไปใช้ผ่าน Windows 5.ติดตั้ง Ubuntu ไว้ Partition นึงแล้ว สลับกัน Boot เพื่อใช้งาน 6.ใช้งาน Linux ใน Windows ซะเลย ด้วย CygWin หรือไม่ก็ coLinux CygWin is a Linux-like environment for Windows. It consists of two parts: * A DLL (cygwin1.dll) which acts as a Linux API emulation layer providing substantial Linux API functionality. * A collection of tools which provide Linux look and feel. Cooperative Linux (short-named coLinux) is a port of the Linux kernel that allows it to run cooperatively alongside another operating system on a single machine. - วิธีติดตั้งและใช้งาน coLinux

Remote control Windows from Ubuntu

Image
มาควบคุม Windows จาก Ubuntu กันบ้างดีกว่า 1.วิธีแรก Remote Desktop Viewer เริ่มจากฝั่ง Windows ต้องติดตั้งโปรแกรม VNCServer เช่น TightVNC , UltraVNC ตัวอย่างนี้เป็นของ TightVNC หลังจากติดตั้งเสร็จก็ตั้งค่าให้ยอมรับการติดต่อ และ ตั้งรหัสผ่าน จากนั้นก็ฝั่ง Ubuntu เริ่มด้วยติดตั้ง Remote Desktop Viewer เสร็จแล้วจะอยู่ในเมนู Applications > Internet พอเปิดโปรแกรมก็คลิก Connect แล้วป้อน host กับ port ไป โดย default จะเป็น 5900 แล้วก็ตามด้วยรหัสผ่านที่ตั้งไว้ วิธีนี้จะเป็นลักษณะของ VNC คือเข้าไปควบคุม Desktop ที่เปิดไว้แล้ว 2.วิธีที่สอง Remote Desktop แบบ Remote Logon เริ่มจากฝั่ง Windows ต้องอนุญาตให้ทำการ remote ได้ก่อน โดยตั้งค่าที่ Enable Remote Desktop on this computer ใน tab Remote ของ System Properties ดังรูป ถัดมาฝั่ง Ubuntu ก็เรียกใช้ Terminal Server Client จากเมนู Applications > Internet ป้อนรายละเอียดที่จำเป็น ดังตัวอย่าง กรณีเลือก Protocol เป็น RDP จะทำงานแบบ Remote Desktop ของ Windows คือ ไม่ได้ไปควบคุม Desktop ที่เปิดอยู่ แต่สร้าง Sesstion ในการ Logon ใหม่ ซึ่งสามารถ Resu...

Remote control Ubuntu from Windows

Image
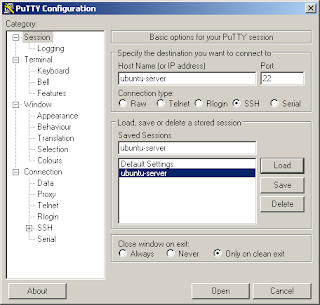
วิธีควบคุม Ubuntu จาก Windows 1.วิธีที่ 1 แบบ Text mode ด้วย SSH เริ่มต้นด้วย การติดตั้ง SSH ใน Ubuntu แล้วก็ remote เข้าไปด้วย SSH client เช่น PuTTY default port จะเป็น 22 2.วิธีที่ 2 แบบ GUI ด้วย VNC เริ่มด้วยการ config ให้ Ubuntu ยอมรับการ remote โดยไปที่ System -> Preferences -> Remote Desktop แล้วก็ทำเครื่องหมายที่ - Allow other users to view your desktop - Allow other users to control your desktop - Require the user to enter this password: แล้วก็ตั้งรหัสผ่าน ที่จะใช้ remote เข้ามา จากนั้นก็ใช้โปรแกรม VNC Viewer จากฝั่ง Windows เข้ามา เช่น UltraVNC หรือ TightVNC โดยป้อนรหัสที่ตั้งไว้ใน Ubuntu เท่านี้ก็สามารถควบคุม Ubuntu จาก Windows ได้แล้วครับ 3.วิธีที่ 3 แบบ GUI ผ่าน SSH เพื่อความปลอดภัย เริ่มด้วย PuTTY เหมือนเดิม แต่คราวนี้ config เพิ่มเติมในส่วนของ Connection > SSH > Tunnels ดังรูป โดยตั้งค่า Source port เป็น 5900 (5900 เป็นค่า default จะเปลี่ยนก็ได้ใน tab Advance ตอนตั้งค่าใน Ubuntu) และ Destination เป็น Host:Port เช่น Ubuntu-Server:5900 ตามรูป แล้วก็ทำการ Con...

Install SSH on Ubuntu

ติดตั้ง SSH ไว้ใช้ดีกว่า เผื่อต้อง remote จากเครื่องอื่นมาใช้งาน Ubuntu ของเรา 1.เลือกใช้ SSH ตัวที่เป็นที่นิยมก็คงเป็น OpenSSH 2.ติดตั้ง ด้วยคำสั่ง sudo apt-get install ssh openssh-server 3.ตั้งค่า port ที่จะใช้สำหรับการเชื่อมต่อ ซึ่งค่าปกติจะเป็น 22 เวลาพวก hacker จะเจาะเข้ามา ก็สุ่ม port นี้ก่อนเลยแหล่ะ งั้นก็เปลี่ยนซะเลยโดยแก้ใน file /etc/ssh/sshd_config 4.restart ssh ด้วยคำสั่ง sudo invoke-rc.d ssh restart

Authenticate Ubuntu Logins with Active Directory

Image
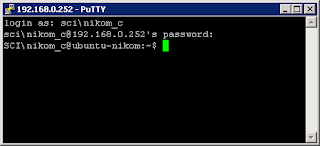
Login เข้าใช้ Ubuntu ด้วย User จาก Active Directory 1.อันดับแรกก็ต้องติดตั้งโปรแกรมเพื่อการนี้ก่อน ได้แก่ likewise-open จาก www.likewisesoftware.com sudo apt-get install likewise-open 2.ต่อไปก็ join Ubuntu เข้ากับ Active Directory ด้วยคำสั่ง sudo domainjoin-cli join [ชื่อ domain แบบ FQDN ] [ชื่อ User ที่มีสิทธิ] ในที่นี้ User ที่มีสิทธิ ก็คือ Administrator นั่นเอง ดังนั้น ถ้า domain ชื่อ sci.com ก็ต้องใช้คำสั่งแบบนี้ sudo domainjoin-cli join sci.com Administrator จากนั้นโปรแกรมจะถาม password ของ Administrator ก็ป้อนไป รอสักครู่ ถ้าไม่มีปัญหาก็จะขึ้นคำว่า SUCCESS 3.จากนั้นก็ทำการสั่งให้โปรแกรมทำงานทุกครั้งที่ boot ด้วยคำสั่ง sudo update-rc.d likewise-open defaults 4.และสุดท้ายด้วยการ สั่งให้โปรแกรมทำงาน sudo /etc/init.d likewise-open start ที่นี้ก็มาทดสอบกันได้เลยด้วยเจ้า PuTTY เรียบร้อยครับพี่น้อง สำเร็จ! Tip1 : ถ้าขี้เกียจ พิมพ์ domain ตามตัวอย่างก็คือ SCI\ ให้แก้ไขไฟล์ /etc/samba/lwiauthd.conf โดยเพิ่มเติมเข้าไปดังนี้ winbind use default domain = yes Tip2 : ถ้าอยากให้แสดง netbios ...