Posts

Showing posts with the label FreeNX

Ubuntu : Install FreeNX

FreeNX เป็นคนละตัวกับ NXServer ของ nomachine ครับ (ของ nomachine จำกัดแค่ 2 session เอง) 1.เพิ่ม repository nano /etc/apt/sources.list เพิ่ม deb http://ppa.launchpad.net/freenx-team/ppa/ubuntu VERSION main deb-src http://ppa.launchpad.net/freenx-team/ppa/ubuntu VERSION main เพิ่ม key แล้ว update apt-key adv --recv-keys --keyserver keyserver.ubuntu.com 2a8e3034d018a4ce apt-get update 2.ติดตั้ง server aptitude install freenx 3.ติดตั้ง client (ใช้ของ nomachine) wget http://64.34.161.181/download/3.4.0/Linux/FE/nxserver_3.4.0-12_i386.deb dpkg -i nxclient_3.4.0-5_i386.deb 4.กรณีต้องการเปลี่ยน SSH key dpkg-reconfigure freenx-server เลือก Create new custom keys จะได้ key อยู่ที่ /var/lib/nxserver/home/custom_keys/client.id_dsa.key สำหรับเอาไป import เข้า nxclient อาจ copy ไปโดยให้คำสั่ง ที่ server cp /var/lib/nxserver/home/custom_keys/client.id_dsa.key ~/ ที่ client scp user@freenx-server:~/client.id_dsa.key ~/
Remote control Ubuntu from Ubuntu

Image
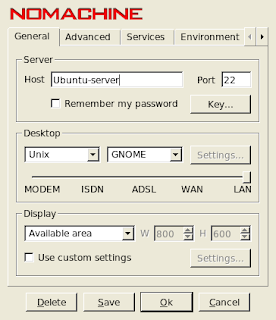
วิธี Remote เข้าไปใช้งาน Ubuntu จาก Ubuntu อีกเครื่องหนึ่ง 1. Text mode ด้วย ssh ssh username@host เช่น ssh komkid@ubuntu-server 2.GUI โดยใช้ vncviewer, Remote Desktop Viewer ด้วยวิธีเดียวกันกับที่ remote ไป Windows 3.ใช้ FreeNX Client ติดต่อไปสร้าง Session ในการ login อันดับแรกก็ download Client จาก NoMachine เลือกที่เป็น DEB แล้วติดตั้งด้วยคำสั่ง sudo dpkg -i nxclient_3.2.0-14_i386.deb จากนั้นโปรแกรมก็จะเข้าไปอยู่ใน Applications > Internet > NX Client for Linux แล้วก็ทำการตั้งค่าเหมือนกับ ที่ทำใน Windows

Remote control Ubuntu from Windows

Image
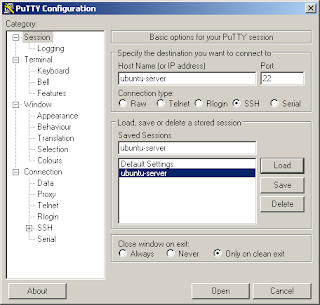
วิธีควบคุม Ubuntu จาก Windows 1.วิธีที่ 1 แบบ Text mode ด้วย SSH เริ่มต้นด้วย การติดตั้ง SSH ใน Ubuntu แล้วก็ remote เข้าไปด้วย SSH client เช่น PuTTY default port จะเป็น 22 2.วิธีที่ 2 แบบ GUI ด้วย VNC เริ่มด้วยการ config ให้ Ubuntu ยอมรับการ remote โดยไปที่ System -> Preferences -> Remote Desktop แล้วก็ทำเครื่องหมายที่ - Allow other users to view your desktop - Allow other users to control your desktop - Require the user to enter this password: แล้วก็ตั้งรหัสผ่าน ที่จะใช้ remote เข้ามา จากนั้นก็ใช้โปรแกรม VNC Viewer จากฝั่ง Windows เข้ามา เช่น UltraVNC หรือ TightVNC โดยป้อนรหัสที่ตั้งไว้ใน Ubuntu เท่านี้ก็สามารถควบคุม Ubuntu จาก Windows ได้แล้วครับ 3.วิธีที่ 3 แบบ GUI ผ่าน SSH เพื่อความปลอดภัย เริ่มด้วย PuTTY เหมือนเดิม แต่คราวนี้ config เพิ่มเติมในส่วนของ Connection > SSH > Tunnels ดังรูป โดยตั้งค่า Source port เป็น 5900 (5900 เป็นค่า default จะเปลี่ยนก็ได้ใน tab Advance ตอนตั้งค่าใน Ubuntu) และ Destination เป็น Host:Port เช่น Ubuntu-Server:5900 ตามรูป แล้วก็ทำการ Con...